 It seems such a simple thing. Take a strip of paper, bend it around, and join the ends. You end up with a familiar and not very interesting object – a simple cylinder. It’s no surprise that when we cut the cylinder in half we end up with two, somewhat narrower, cylinders. This is easy to do, and easy to visualise.
 But this article is going to be an introduction to topology. In topology we discard the concept of distance and angle. We are allowed to smoosh things about, stretching, squashing, and generally deforming things. No tearing, cutting, and glueing allowed, unless we put things back afterwards.
For these reasons topology has sometimes been called ‘rubber sheet geometry’. Topology does talk about shapes, but it turns out that that description is attractive, catchy, and wrong. We will see why later.
So we take a fresh look at the cylinder, and ask a rather odd question: How many sides does a cylinder have?
In geometry, a square has four sides, but we might equally well say it has two sides – front and back. Indeed, if you want to paint a square you can use two different colours without the colours meeting each other. Of course, this article is about topology and not geometry, and in topology a square is the same as a triangle, which is is the same as a disc. Each one can be ‘smooshed’ into the others, so they are the same. 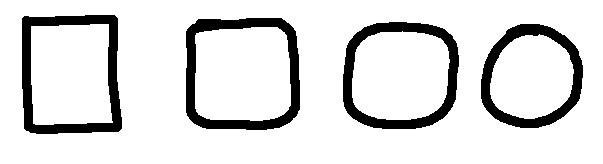
And that is the concept we use. A ‘side’ is a surface that you can get to all parts of by walking around, but without crossing over an edge. An ‘edge,’ of course, is where sides meet.
But examples are the best way to make this clear. In topology, a cylinder has two sides (inside and outside) and two edges. A disc, by comparison, has two sides, but only one edge. We can run our finger all the way around the edge of a disc without ever lifting it off, and we cover all parts of the edge.
So a cylinder has two sides, and two edges, while a disc has two sides, and only one edge. These facts remain true, even if we then distort the cylinder or disc – bending, stretching, twisting – we still have the same number of sides, and the same number of edges.
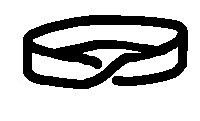 Now take another strip, bend it around, align the short edges, and before joining them, insert a half twist. The resulting figure is called a Möbius strip, or Möbius band.
When first presented to people it can cause quite a stir, especially when you ask them to cut it in half. Most people are quite surprised to find that when we cut the Möbius strip in half (running around the ‘equator’) it does not fall into two pieces. Instead we get one long strip with some number of twists in it.
Cutting it in thirds is even more entertaining, because then we do get two pieces, but they are different sizes, and they are linked! In fact, with a small amount of analysis some of these facts can be deduced in advance.
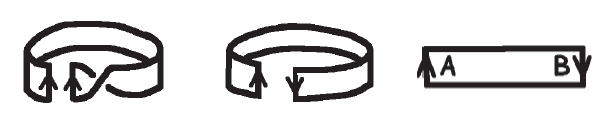
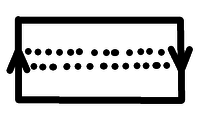
Firstly, it’s inconvenient to have to draw 3D pictures of these things, so we use a neat technique. We imagine cutting the Möbius strip back into a single strip, but mark the cut with arrows to show that we need to consider them as still joined. We call this surgery – we cut things into pieces, but remember which bits need to be sewn back together.
 So here we cut the strip, then untwist, and open it out. In the resulting diagram the two ends should be regarded as, in principle, still joined, with the arrows showing that we need to have the half twist. The locations marked
  and
and  are still quite close to each other.
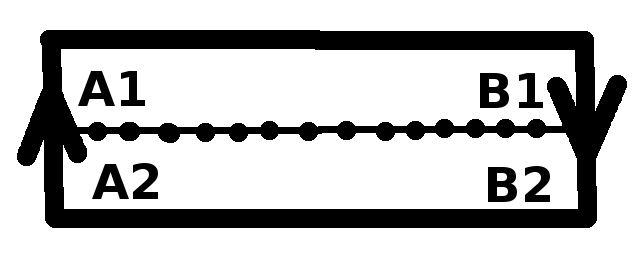 Now we can look at cutting the Möbius strip in half along its length. That is along the dotted line, and we can see that
  is on the same piece as
  , but at the joining of the edges is next to
  , which is on the same piece as
  . We can also see that is – via the join – next to , which is on the same piece as , and so we end up with just a single piece. Trying to work out how many twists we end up with is trickier.
 Cutting it in thirds yields to a similar analysis. If you imagine the middle third to be really wide – most of the width, then we can see that the middle third is really just the whole Möbius strip with some of the edge shaved off.
 Similarly, if we imagine the middle third shrinking in width until it nearly disappears, you can see that the outer part must effectively just be the same as a Möbius strip cut in half.
This idea of looking at extreme versions of something is an incredibly powerful technique for understanding new things in terms of things you already know.
So cutting a Möbius strip in thirds yields a double length strip with some number of half twists, and a slimmed down Möbius strip. Why they are linked would be a matter for further investigation.
All of this will be familiar to many, but not all, of our readers. Also familiar will be the idea that a cylinder has an inside and an outside, and hence has two sides, and it has an edge at the top and an edge at the bottom, and hence two edges. A Möbius strip, however, only has one side. If you start painting and keep going, you end up painting the entire surface – both ‘sides’ – even though you stayed on a single surface and never crossed an edge. This also surprises a lot of people, but we can see what happens again by using our diagram. We start on the front of the strip, and as we go rightwards (or leftwards) we get to the edge that will be joined on, but it gets ‘turned over’, so we are now on what we originally think of as the back of the strip. So all parts of the surface are accessible, just by walking around.
So far, so familiar. But now…
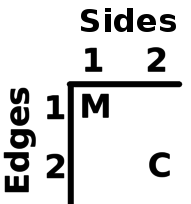 In maths we don’t just collect facts and curiosities, we want to organise them to see if we can spot patterns. So we can create a table to illustrate what’s going on. We have a column for the number of sides, and a row for the number of edges, and we have put the cylinder and Möbius strip in the appropriate spots. Immediately we then ask – what about all the other places?
Let’s go for something that does not seem too exotic – what can you think of that has two sides, but only one edge? Some people get that instantly, others take longer, but eventually we can see that a disc – a circle including the interior – has two sides, and only one edge. In fact, since we are allowed to distort things, we can see that a square can be moulded continuously into a circle, so a square also has two sides and just the one edge.
We can put that in our table – a disc has two sides and one edge. But we still don’t have much. We could have rows for three edges, four edges, and more. What might go in those rows?
 Let’s play with the things we already have. To start with, let’s distort the cylinder. We start by shrinking the top edge, making it slightly smaller. Then we take the lower edge and stretch it out so we have a sort of lampshade shape. Continue this process, shrink the top edge a little more, stretch the bottom edge a lot more – we get a wide, shallow lampshade.
Finally, squash it flat, and what do we have? It is effectively a disc, but it has a hole in it. We have a disc with a hole.
So in fact a cylinder ( ) is, in topology, a disc (
 ) with a hole (
 ) in it. We can – loosely speaking – write
  And looking at the table, perhaps we can deduce that going down the table is just adding extra holes.
And that makes sense. If you punch a hole in a thingy, whatever the thingy may be, by punching the hole you have created an extra edge. So we can go down the table, merrily punching holes in our surfaces to get the next object downwards.
But if going down the table is achieved by adding a hole, then we would like going up the table to be subtracting a hole. Wouldn’t that be nice? And it seems to be reasonable, until we get to the disc and say:
What do we get if we subtract a hole from a disc?
Will that give us a surface with two sides and no edges?
To answer that, we need to be a bit more precise about what we mean when we say ‘subtract a hole’. One way to see that is to imagine welding a patch onto – or into – the hole, thus removing the hole. So to ‘subtract’ a hole means to take a disc and glue the edge of the disc to the edge of the hole.
But to subtract a hole from a disc we need to find the hole into which we glue the patch. Where is the hole? The clue is in the characteristic of a hole – it has an edge. The hole we are going to patch is the edge. We distort the disc into a bowl shape, and then glue a disc – the patch – to the edge of the bowl. What do we get?
A sphere.
So a ‘disc minus a hole’ is, in a very real sense, a sphere. Of course, we can also say that if you punch a hole in a sphere then what you get is a disc, but that feels rather less dramatic. Or surprising. But we can see that a sphere really does have the required two sides and no edges. It is not the only surface with two sides and no edges, but it is, in a very real sense, a disc minus a hole.
Before moving to a final challenge, we return to the comment at the top of the article, where we said that calling topology ‘rubber sheet geometry’ is misleading. The reason is shown here in this diagram showing two representations of a cylinder with a hole. No matter how hard you try, the top version cannot be twisted or distorted into the second version. It can if you are allowed to move things into an extra dimension, but that’s a technique for another time. In three dimensions, these two representations are different, even though in topology we think of them as the same. They are both cylinders with holes.
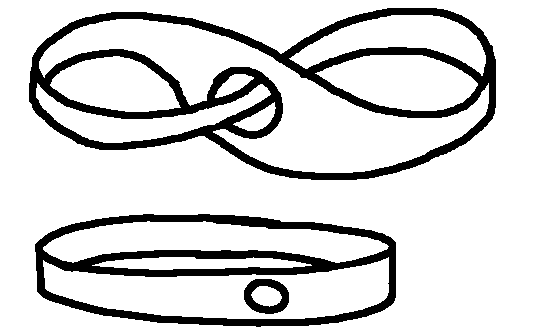 We can see that they are the same if we allow ourselves to cut, and then re-glue. Snip across the strip and open it out. Now you can either re-glue with the strip passing through the hole, or without the strip passing through the hole. You could even have the strip pass through the hole multiple times. You still have, in strict topological terms, simply a cylinder with a hole.
This is why it is misleading to say things are the same if we can distort one into the other – sometimes that’s not enough. If you choose to do so you can make that your definition of things being the same, but then you would have a non-traditional form of topology, and one that has not (so far) been found to be as useful as the usual definition.
And so on to our final challenge. It’s a tough one, and this article has not covered in depth all the techniques you will need to use, although it has covered all the ideas. You will only solve this if you are willing to play, explore the ideas, and try things. You will need to accept that you probably won’t get it on the first try, and you may need to try lots of ideas before you hit upon the right one.
So here it is. If we take a strip of paper and we are allowed to stretch and distort things, we can create a cylinder by gluing opposite edges without a twist, and we can create a Möbius strip by gluing opposite edges with a twist. That is shown in the diagram here, with the rectangle marked and the one marked  .
.
 We can also glue adjacent edges. A little thought will show that you get the same result if they both point to the corner as you do when they both point away from the corner. If you have a square and mark two adjacent edges with arrows both pointing toward the corner, when you glue those edges together you will get a cone, which can be flattened out to give a disc.
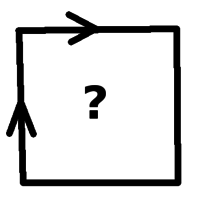 But here is a mystery object. Again we start with a square, and we mark two adjacent edges with arrows, indicating that they need to be glued together, but now one points towards the corner, and the other points away. What do you get then?
No guessing, see if you can work it out. Remember, you can stretch, distort, bend, and you can even cut, provided you reglue. There are many, many things you can try, and most won’t work. Can you find one that does? Maybe a bit of surgery is in order.
Can you work out what this mystery object is?
Can you prove it?
Good luck!
Colin Wright
Solipsys Limited
Reproduced from Mathematics Today, August 2016
Download the article, Maths in a Twist (pdf)


